
![]()
Using iLok License Manager🔗
What’s in the App🔗
Your screen always shows your locations on the left, the navigation and relevant action options at the top, and information grids on the right. Each item that you can select (a location, your account, a license) has a Detail pane that you can show or hide.
Account🔗
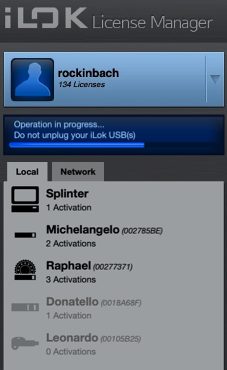
Your account appears at the top of the left column. Click the gray drop-down triangle on the right side of this area to sign out.
Progress / Message Area🔗
Below your account is a blue area where progress bars and messages are displayed while server operations are in progress. Do not connect or disconnect iLok USBs or close the application while work is in progress.
Location List🔗
Below the progress bar is the location list. It always has a “Local” tab. If you have added any iLok Server connections via the Activation Experience or using Preferences > Network > My Connections, the location list will also have a ‘Network’ tab.
Local tab
(Ctrl/Cmd+L)
If you have an iLok Cloud session open, it will be the first entry in the Local tab. Otherwise, the first entry is always the computer that you are currently using. Underneath that is a list of locations in this order:
-
Other computers that do not currently have any licenses activated to them will not appear in the location list, even if you have previously activated licenses to them.
Other computers than the one you are currently using, that have licenses activated to them
-
iLok USBs plugged in that belong to your account
- iLok USBs plugged in that belong to other accounts or are not currently registered
- Offline (not plugged in) iLok USBs that belong to you.
Plugged in iLok USBs that are connecting to our servers have a dark icon. Offline iLok USBs that are registered to your account are grayed out. Each iLok USB’s icon will also show whether the iLok USB has Zero Downtime™ (ZDT) coverage and whether Theft & Loss Coverage is enabled on the iLok USB. The icon may change if a time-sensitive deadline is approaching. If you are ever unsure of what an icon means, just hover over it for a helpful hint, or see What do the icons in the location list mean?
Network tab
(Ctrl/Cmd+N)
The Network tab shows all network locations that you are currently connected to. If you have added locations but they are not currently connected, the Network tab appears in the Location List but is empty.
When you select a network location, the right side of the app displays all licenses found on that iLok License Server. It also indicates the number of available seats and whether you are currently using one of the seats.
Show/hide offline locations
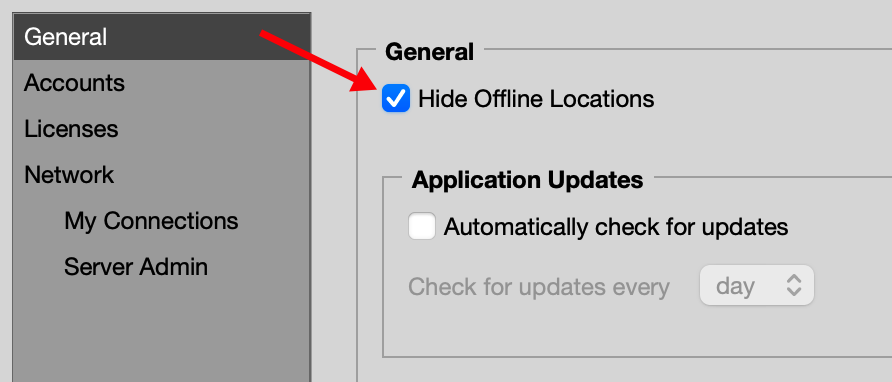
To hide offline locations from the Location List, go to Preferences > General and check the ‘Hide Offline Locations’ box. Any locations associated with the iLok account that are not currently online will disappear.
To display offline locations again, go to Preferences > General and uncheck ‘Hide Offline Locations’. Any locations that have been hidden and are still associated with the iLok account will reappear.
Note
Previous host computer locations that you have requested to be reset will not reappear. Locations that have been reset are no longer available.
Navigation/Actions🔗

When you select your Account on the left side of the app, five navigation tabs appear at the top of the app. If your Account is selected on the left side of the app but you don’t see the tabs, widen the application window.
- All Licenses (Ctrl/Cmd+1): a list of all licenses in your account
- Available (Ctrl/Cmd+2): a list of licenses that you can activate to a location
- All Activations (Ctrl/Cmd+3): a list of all licenses that you have activated to a location. This list also shows what location each license is on.
- Unavailable (Ctrl/Cmd+4): a list of licenses that have expired, been surrendered, or transferred to another User account
- Hidden (Ctrl/Cmd+5): a list of licenses you have chosen to hide from the other navigation tabs.
To the right of the account view selector is a Search field (Ctrl/Cmd+Shift+F). Use this to filter your list of licenses by any of the information in the grid below it, such as Product Name, Deposit Date, Publisher, etc.
The last part of the navigation/actions area is an icon menu for the following operations:


License List🔗
(Ctrl/Cmd+6)
The right side of your screen shows the contents of the currently selected location in your location list. This can be your account, your computer, an iLok USB, or an iLok Cloud session.
Licenses listed in bold type are licenses that you haven’t viewed (clicked on) with the iLok License Manager.
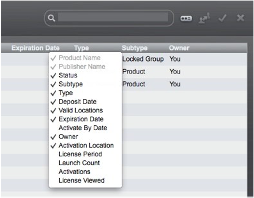
You can customize the columns that are shown in the list. Right-click in the gray table header where the column names are and choose which columns you would like to display or hide.
You can also rearrange the columns by clicking the column name and dragging it to a new location.
Detail Pane🔗
(Ctrl/Cmd+I to show, Ctrl/Cmd+Shift+I to hide)
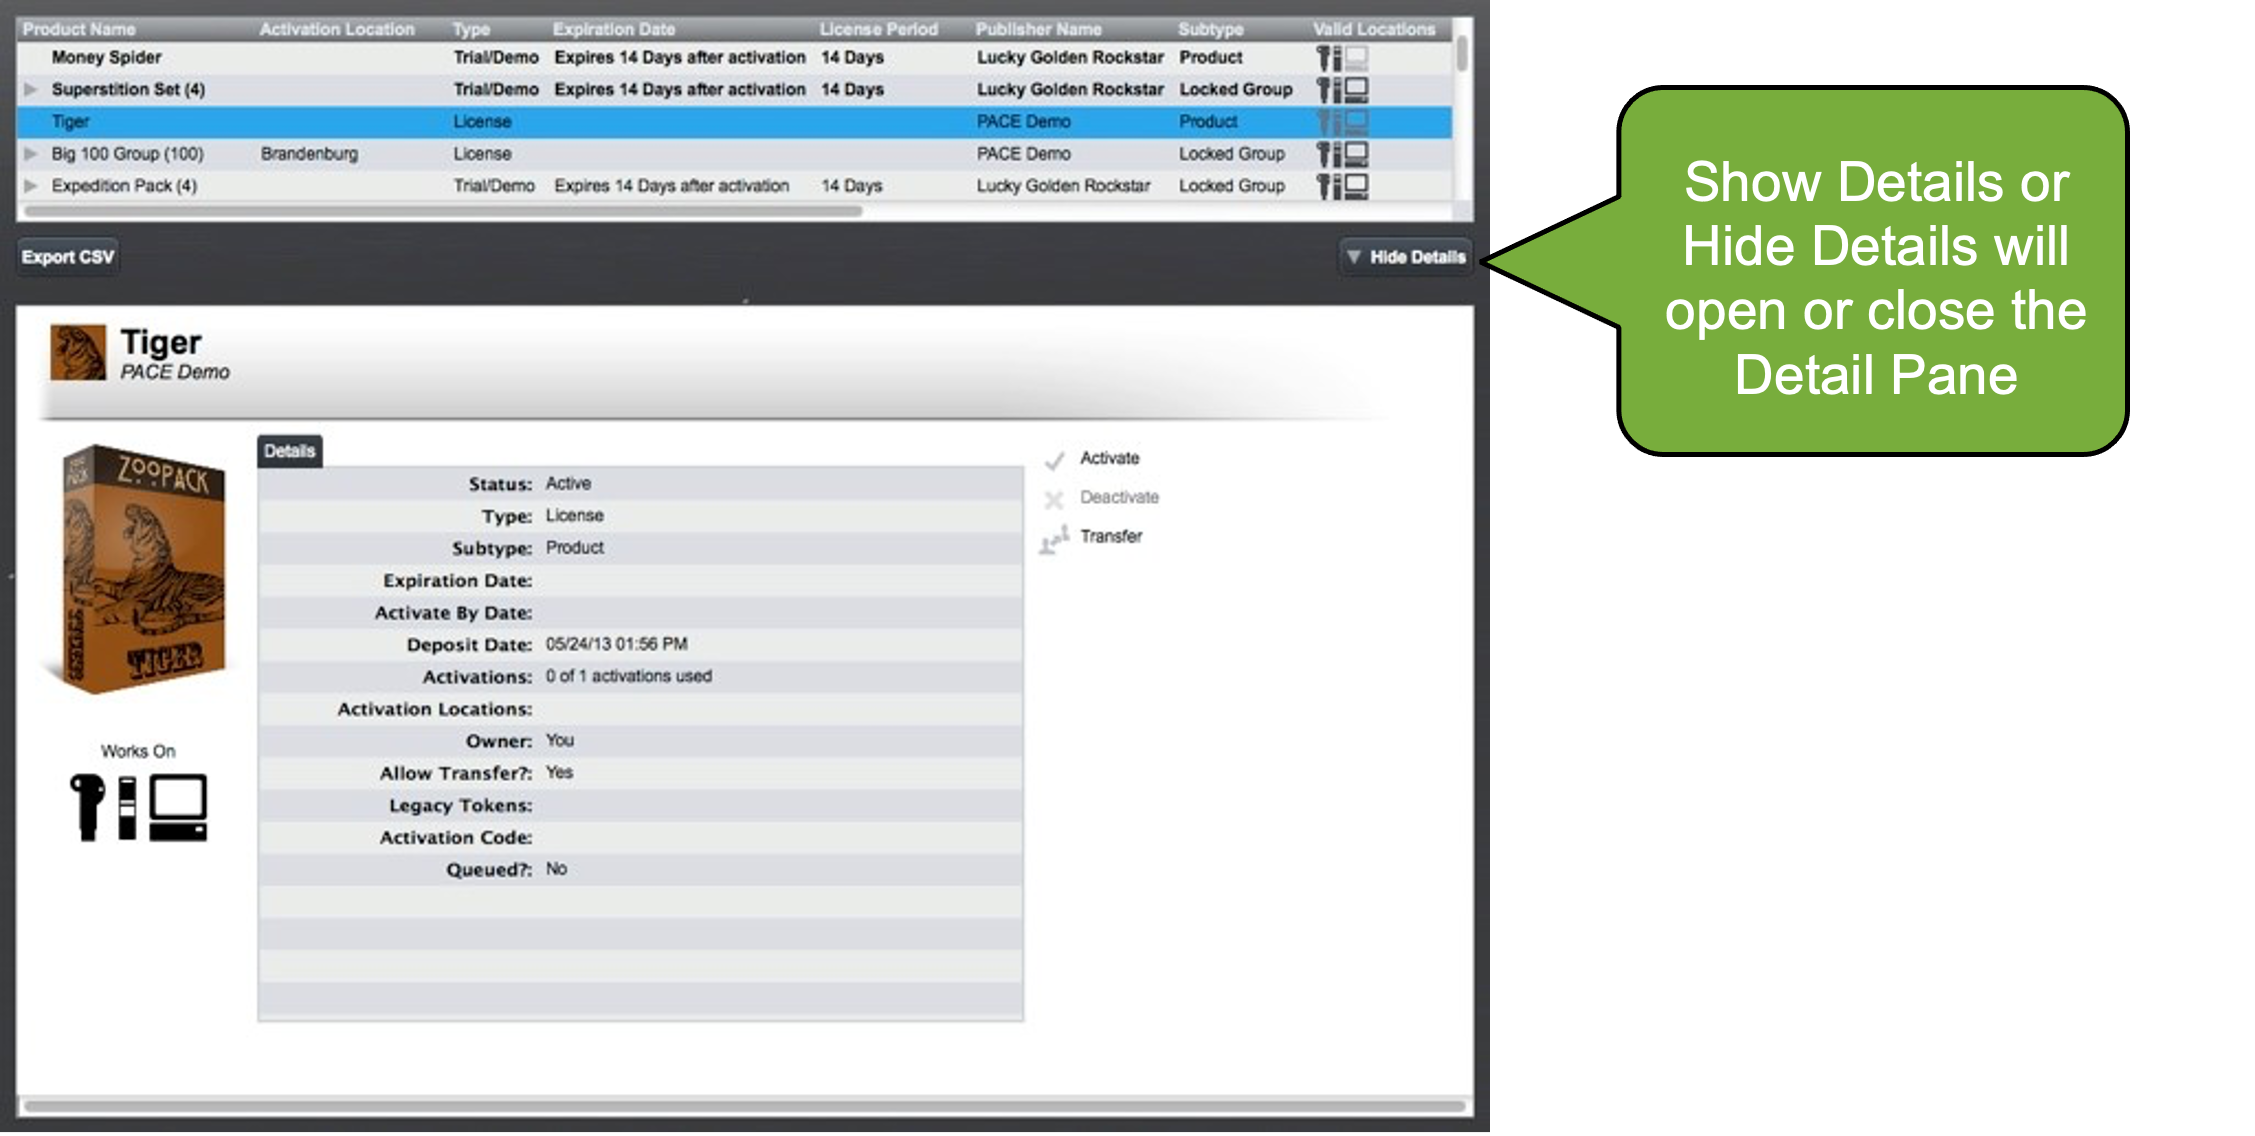
Double-click a license in the grid or use the Show/Hide Details button to open or close the Detail Pane.
The detail pane shows you information about the selected item and has links to allow you to work on it.
- Your account: You can see your iLok account information, how many licenses you have, and find links to go to iLok.com to edit it or to use our support resources.
- Your iLok Cloud session: You can see your iLok Cloud session status, how long the session has been open, which mode the session is in, and how many licenses are activated to the session. You can also switch between Managed and Automatic modes or close your session.
- Your computer: You can see your basic account information, how many licenses have been activated to your computer, and your computer’s Location ID.
- Your iLok USB: You can see the iLok USB’s serial number, name, description, and you can edit some of these fields if the iLok USB belongs to you. You’ll also find the status of your Zero Downtime™ subscription and be able to manage your Theft & Loss Coverage settings. There is also a ‘Synchronize’ button and a link to iLok.com for support resources.
- A License or Group: These will have detailed information about the product and your license, including the types of locations the license will work on (e.g.,

 ), any date or time limitations, the original deposit date of the license (it does not change even if you bought it from another User), and other
important information. You’ll find links to Activate, Deactivate, and Transfer the license, and a link to the software publisher’s website.
), any date or time limitations, the original deposit date of the license (it does not change even if you bought it from another User), and other
important information. You’ll find links to Activate, Deactivate, and Transfer the license, and a link to the software publisher’s website.
Accessibility🔗
Note
To take full advantage of the screen reader annotations on macOS, go to System Settings > Keyboard > Keyboard navigation and turn the toggle on to allow you to tab through all controls.
Screen Readers🔗
iLok License Manager is annotated for screen readers, such as VoiceOver, Narrator, JAWS, and NVDA.
Keyboard Shortcuts🔗
iLok License Manager has shortcuts for keyboard navigation.
The keyboard shortcuts in this list are also provided in context on this help site.
-
Note
Once a part of the app has focus, the Up and Down keys will allow you to navigate the list.
Ctrl/Cmd+1 - “All Licenses” tab: selects Account and gives focus to the license list view.
-
Ctrl/Cmd+2 - “Available” tab: selects Account and gives focus to the license list view.
- Ctrl/Cmd+3 - “All Activations” tab: selects Account and gives focus to the license list view.
- Ctrl/Cmd+4 - “Unavailable” tab: selects Account and gives focus to the license list view.
- Ctrl/Cmd+5 - “Hidden” tab: selects Account and gives focus to the license list view.
- Ctrl/Cmd+6 - License List: gives focus to the license list in whatever location you are already viewing.
- Ctrl/Cmd+Shift+A - Activate
- Ctrl/Cmd+Shift+D - Deactivate
- Ctrl/Cmd+L - Local Locations: gives focus to the Location List, in the Local tab.
- Ctrl/Cmd+N - Network Locations: gives focus to the Location List, in the Network tab.
- Ctrl/Cmd+I - Show Details: gives focus to the Detail pane.
- Ctrl/Cmd+Shift+I - Hide Details: focus is returned to the item you were showing the details of.
- Ctrl/Cmd+Shift+F - Search
Managing Your Licenses🔗
Visit the FAQ to learn how to manage your licenses, including:
- Activate a License
- Deactivate a License
- Move a License
- Transfer A License
- Remove an iLok USB from Your Account
Further Information🔗
Most of your iLok USB and iLok License Manager questions can be answered by using the Keyword Search in the header of this site. You can use the F key on any Help page to open the Search, or browse the FAQ pages and click through the categories until you find your answer. We recommend trying the Search first.